Monster7's Photo Blog
Aller Anfang ist schwer
\\Deutsch//
Hallo, wir sind Monster7
Seit 2016 machen wir gemeinsam Bilder und wir wollten unsere Erfahrungen gerne mit euch teilen.
GeniMonster wird euch über das Dasein als Model/Cosplayer berichten während Kimball euch über seine Anfänge in der Fotografie berichten wird.

GeniMonster (Model & Editing)
x
Kimball (Photography).
All beginning is difficult
\\English//
Hi, we're Monster7
We have been taking pictures together since 2016 and we wanted to share our experiences with you.
GeniMonster will tell you about being a model/cosplayer, while Kimball will tell you about his beginnings in photography.
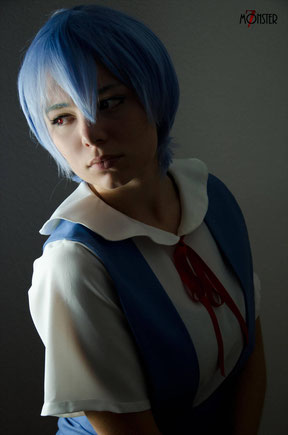
# 1 Erste Schritte / First step (by Kimball)
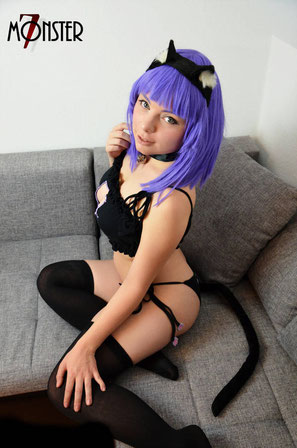
Hallo, ich wollte euch mal erzählen wie ich mit dem Fotografieren angefangen habe und dies in einigen Bildern als Tutorial aufbauen. Hier auch gleich zu meinen ersten Bildern die ich mit
GeniMonster gemacht habe.
Zu diesem Zeitpunkt hatte ich mich kaum mit Fotografie auseinandergesetzt ich nutzte den Automodus der Nikon D5100 und ein 18-105mm f3.5-5.6 wobei die Zahlen am Objektiv keine große Rolle für
mich spielten.
Tatsächlich hatte ich eigentlich eher Wert auf den Bildausschnitt gelegt, was ich in einer späteren Phase etwas aus dem Auge verlor. Hier entwickelte ich schon eine Vorliebe für Bilder aus sehr
hohen Perspektiven was den Kopf des Models größer wirken lässt und meiner Meinung nach die Augen und das Gesicht somit noch mehr in den Mittelpunkt stellt.
Desweiteren macht diese Perspektive den Rest des Körpers schmaler, was auch nicht immer von Nachteil ist.
Mehr dann zum nächsten Bild.
Hello, I wanted to tell you how I started taking pictures and build this up as a tutorial in some pictures. Here is also to my first pictures that I took with GeniMonster.
By then I had barely dealt with photography I took advantage of the automode of the Nikon D5100 and an 18-105mm f3.5-5.6 with the numbers on the lens not playing much of a role for me.
In fact, I had actually placed more emphasis on the image section, which I lost a bit of my eye at a later stage. Here I already developed a preference for images from very high perspectives,
which makes the model's head appear bigger and thus, in my opinion, puts the eyes and the face even more at the center.
Furthermore, this perspective makes the rest of the body narrower, which is not always detrimental.
More then to the next picture.
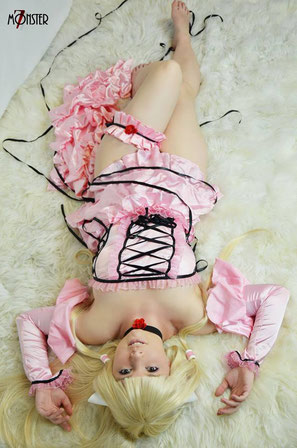
# 2 ISO (by Kimball)
Bei diesen Bildern fing ich an
mich mit dem ISO-Wert und dem Rauschverhalten auseinanderzusetzen.
Dieser beschreibt die Lichtempfindlichkeit des Bildsensors.
Ich las in einem Bericht, dass einige Zeitschriften Bilder mit einem ISO-Wert höher als 400 nicht akzeptieren und so wurde dieser Wert zu einer Art Dogma. Ich versuchte also stehts mit dem
ISO-Wert nicht hoch zu gehen, was aus jetziger Sicht vermutlich mein größter Fehler war und mich viele gute Bilder kostete da diese unscharf waren wegen der
Verschlusszeit die gerade so bei 1/60s lag. Eine sechzigstel Sekunde klingt nicht viel sorgt aber bei kleinen Verwacklern, welche gerade bei unkonventionellen Körperhaltungen (zu finden im
kamerasutra) gerne vorkommen, allerdings für ausreichend Unschärfe.
Jedoch brachte mich das glücklicherweise dazu mich mit der Beleuchtung und der Blendenöffnung f auseinanderzusetzen, da ich ja die Verschlusszeit, auch Belichtungszeit genannt, verkürzen wollte
um Bewegung auch einfrieren zu können ohne Schärfeverlust.
Im nächsten Bild geht es ums Licht.
This describes the photosensitivity of the image sensor.
I read in a report that some magazines do not accept images with an ISO value higher than 400 and so this value became a kind of dogma. So I tried not to go up with the ISO value, which from my current point of view was probably my biggest mistake and cost me a lot of good pictures because they were out of focus because of the shutter speed which was just 1 / 60s. One sixtieth of a second does not sound like much, but it does provide a lot of blurring for those little jittery people who just like unconventional postures (found in camerasutra).
However, fortunately that got me to deal with the lighting and the aperture f, because I wanted to shorten the shutter speed, also known as shutter speed, to freeze movement without loss of sharpness.
The next picture is about the light.
# 3 Licht / Light (by Kimball)
Ich arbeitete bereits mit 2 Softboxen, weitere Lichtquellen wie Zimmerlicht stellten tatsächlich ein Problem dar. Das zusätzliche Licht stimmt meistens in der Lichtfarbe nicht überein und erzeugt ungewollte Reflektionen vor allem in den Augen. Eine Neuausrichtung der Softboxen war für mich wichtig da ich damals eigentlich keine Schatten in den Bildern wollte. Die nächste Möglichkeit mehr Licht und somit einen geringeren ISO zu bekommen wäre ein Objekiv mit einer größeren Blende z.B. f 1,8 darauf gehe ich im nächsen Beispielbild ein. Ein Problem bei Fotos im geschlossenen Raum ist auch der Platz, wie bei diesem Bild, weshalb ich meisten weitwinklige Einstellungen an meinem Objektiv gewählt habe. Der Bildausschnitt bei 18 oder 35mm (bei Crop 28-55mm) war einfach schön groß und ich konnte somit auch nah am Model stehen und dieses trotzdem noch komplett abbilden. Ich habe mich dabei aber auch wieder von Informationen bezüglich der Verzerrung durch weitwinklige Aufnahmen beeinflussen lassen und versucht im Bereich 35-50mm zu bleiben, doch es erwies sich als besser die Verzerrungen in Kauf zu nehmen als sich auf zu kleine Bildausschnitte einzulassen. Hierzu muss ich nochmal erwähnen dass es sich bei einer Nikon D5100 um eine Kamera mit Crop-Faktor handelt hier bin ich jetzt mal Faul und nutze einen Wikipedia Link: https://de.wikipedia.org/wiki/Formatfaktor .
Mit dem nächsten Bild gehe ich dann auf die Blende ein.
I already worked with 2 softboxes, other light sources such as room light actually presented a problem. The additional light
usually does not match the light color and produces unwanted reflections, especially in the eyes. A reorientation of the softboxes was important to me because I did not really want any shadows in
the pictures back then. The next possibility to get more light and thus a lower ISO would be an objecive with a larger aperture e.g. f 1.8 I will go into the next example picture. A problem with
photos in the closed space is also the space, as with this picture, which is why I have chosen most wide-angle settings on my objective. The picture detail at 18 or 35mm (at crop 28-55mm) was
just great and I was able to stand close to the model and still picture it completely. However, I was again influenced by information about the distortion caused by wide-angle shots and tried to
stay in the range 35-50mm, but it proved to be better to accept the distortions than to engage in too small image sections. For this I must mention again that it is a Nikon D5100 with a camera
with cropping factor here I am now time lazy and use a Wikipedia link: https://de.wikipedia.org/wiki/Formatfaktor.
With the next picture I go to the aperture.
# 4 Blende f / aperture , f-stop (by Kimball)
Hiermit sind wir bei den f-Angaben auf den Objektiven aus dem ersten Teil angekommen.
Mit der Blende f wird vereinfacht gesagt die Lichtmenge bestimmt gleichzeitig aber noch festlegt wie groß der Bereich ist der im Bild noch scharf ist.
Für mich ein positiver Effekt, da wenn ich auf die Augen fokussiere bei einer Blende f 1,8 der Hintergrund unscharf wird und somit die Aufmerksamkeit wie in diesem Bild auf das Model gelenkt
wird.
Ein Problem bei diesen Bildern war das harte Licht der Sonne und die Schatten die diese im Gesicht erzeugen. Erst später an einem Kurs in einer Volkshochschule lernte ich die meines Erachtens
beste Anwendung des integrierten Blitzes, nämlich die Aufhellung genau dieser Schatten - aber wer kommt am Anfang auch auf die Idee bei strahlender Sonne den Blitz zu benutzen.
Im nächten Bild geht es um Platz und Wasser.

Simplified, the f-stop determines the amount of light but at the same time determines how big the area in the picture is still sharp.
For me a positive effect, because when I focus on the eyes at a f-stop f 1.8 blurs the background and thus the attention is directed to the model as in this picture.
One problem with these pictures was the harsh light of the sun and the shadows they create in the face. Only later on a course in a community college, I learned the best of my application, the integrated flash, namely the lightening of exactly these shadows - but who comes in the beginning on the idea in the bright sun to use the flash.
The next picture is about space and water.
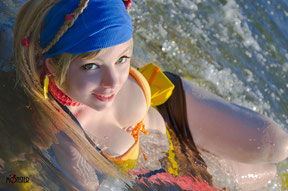
# 5 Badewanne / Bathtub (by Kimball)
Bei diesen Bildern stieß ich auf einige Probleme, zwar ist für die Portrait Fotografie eine Brennweite von 35mm – 85mm sehr gut doch leider benötigt man den entsprechenden Platz.
Eine Badewanne unter einer Dachschräge bietet dies nicht, allerdings ist es auch kaum nötig Unschärfe im Bild zu erzeugen außer eventuell auf dem Körper.
Somit kann man also gut zu einem weitwinkligerem Objektiv greifen.
Dazu kommt die Beleuchtung die Platz benötigt, aber der Platz der ausgeleuchtet werden muss hält sich hierfür in Grenzen, kleinere Leuchten reichen also aus.
Wichtig bei Wasser, es ist durchsichtig, es fällt also auf Bildern kaum auf. Wir wollten dem entgegenwirken indem wir Blüten in das Wasser verteilten. Leider war der Effekt am Ende nicht so gut,
das Wasser einfärben wäre wohl noch etwas besser gewesen. Einfärben stellt aber ein Risiko für das Cosplay dar also auch nicht optimal.
Im nächsten Bild dann etwas mit Schatten und farbigem Licht
In these pictures, I came across some problems, although for the portrait photography, a focal length of 35mm -
85mm is very good, but unfortunately you need the appropriate space.
A bathtub under a sloping roof does not offer this, but it is hardly necessary to create a blur in the picture, except on the body.
So you can grab so well to a wide-angle lens.
In addition, the lighting needs space, but the space that needs to be lit is limited, so smaller lights are sufficient.
Important for water, it is transparent, so it is hardly noticeable on pictures. We wanted to counteract this by distributing flowers into the water.
Unfortunately, the effect was not so good in the end, the water would probably have been a little better. Coloring, however, poses a risk for
cosplay, and therefore not optimal.
In the next picture something with shadow and colored light.
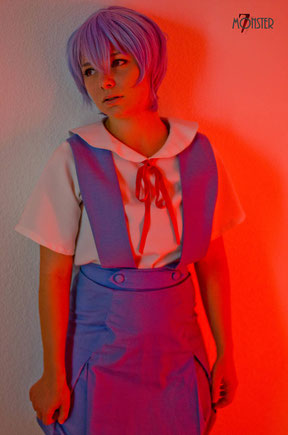
# 6 Schatten und Farbe / Shadow and Colour (by Kimball)
Für diese Bilder wählten wir eine einfachen tristen Hintergrund. Im Laufe des Fotoshootings wurden dies aber recht langweilig.
Glücklicherweise war eine rote Leuchtstoffröhre in der nähe und ich versuchte das Farbige Licht auf den Bildern ein zu setzen. Die Soft boxen schluckten Leider den größten Teil der Farbe diese
musste ich also abschwächen,in einem weißen Raum kann man ja dann auch die reflektierende wand nehmen.
Achtung wenn Licht auf eine farbige Wand strahlt ist das reflektierte Licht auch farbig.
Die abgewandten Leuchten Ließen Schatten entstehen diese waren eine schöne Abwechslung.Leider finde ich die Bilder zwar nicht so gut gelungen, allerdings war der Lerneffekt groß. Genutzt habe ich
dies später jedoch kaum liegt wohl auch an der Art meiner Bilder die nur selten was düsteres haben.
For these pictures we chose a simple drab background. In the course of the photo shoot, however, these were quite boring.
Fortunately, there was a red fluorescent tube nearby and I tried to put the colored light on the pictures. The soft boxes unfortunately
swallowed most of the color, so I had to weaken it, so in a white room you can take the reflective wall.
Attention when light shines on a colored wall, the reflected light is also colored.
The far away lights left shadows arise these were a nice change.
Unfortunately I think the pictures are not so well done, but the learning effect was great. I have used this later, but hardly because of the nature of my pictures that rarely have something dark.
# 7 Fotohintergrund / Photo background (by Kimball)
Fotohintergründe sind echt gemein wenn diese nicht gebügelt wurden die Falten haben mich während des Fotoshootings kaum gestört.
Die Nachbearbeitung erwiest sich auch als nicht so einfach, da jeder Bildschirm eine andere Wiedergabe für schwarz hat. Auf den Handys und der Kamera sahen die Bilder ganz anders aus als auf dem
Monitor. Was zum ersten Kontakt mit Bildschirmkalibrierung führte. Ein extra Kalibrierungswerkzeug rechnet sich für mich aber wohl kaum also habe ich meinen
Bildschirm über ein Testbild im Internet kalibriert. Nicht so genau aber ausreichend.
Über Unschärfe im Bild hätte ich dies auch lösen können allerdings sind meine Hintergründe für große Abstände nicht geeignet und über die Blende weniger Tiefenschärfe war aufgrund der Schilder
nicht möglich.
Die Schilder am besten Parallel zur Kamera und in der Nähe der Augen halten damit diese gut lesbar sind oder eine kleinere Blende für mehr Tiefenschärfe.
Im nächsten Bild geht es raus in schwieriges Terrain.

Photo backgrounds are really mean if they were not ironed the wrinkles did not bother me during the photo shoot.
The post-editing also turned out to be not so easy, since each screen has a different rendering for black. On the phones and the camera, the pictures looked very different than on the monitor.
Which led to the first contact with screen calibration. An extra calibration tool won't pay off for me so I have my screen calibrated with a test image from the internet. Not so accurate but
sufficient.
About blur in the picture, I could have solved this, however, my backgrounds are not suitable for long distances and on the aperture less depth of field was not possible because of the
signs.
The signs should be kept parallel to the camera and near the eyes so that they are easy to read or a smaller aperture for more depth of field.
In the next picture it goes out into difficult terrain.
# 8 Am Fluss / Outdoor River (by Kimball)
Dieses war das erste Mal, dass ich Fotos an einem Ort gemacht habe der sich als sehr unwegsam erwies. Anfangs versuchte ich noch aus Winkeln Fotos zu machen bei denen ich möglichst kaum in das Wasser musste oder dies Barfuß tun konnte. Barfuß in einem Fluss mit Kamera in der Hand kann ich aufgrund des schlechten Halts und der rutschigen Oberfläche nicht empfehlen.
Am Ende stand ich also mangels guter Vorbereitung mit Schuhen im Wasser und musste mit nassen Füßen auch nach Hause fahren.... dieses Gefühl wenn man ein Pedal
tritt und das Wasser langsam aus der Sohle zwischen die Zehen gedrückt wird, unbeschreiblich.
Aber ansonsten war der Fluss super um Bilder zu machen, durch die Tageszeit gab es zwar wieder starke Schatten am Körper diese wurden aber durch die Reflexion des Wassers etwas aufgehellt. Schöne
Lichtspiele wären mit dem reflektierenden Wasser währen auch möglich gewesen.
Auf die Idee die Schatten mit einem Blitz aufzuhellen bin ich hier allerdings noch nicht gekommen, einen Reflektor hatte ich allerdings dabei. Der Reflektor erwies sich nur mit einem kleinen
Stativ und einer Klammer bei dem Gelände als recht Nutzlos. Noch so ein Fehler in der Vorbereitung nächstes mal für so was ein Stativ das nicht weg schwimmt und mehr/bessere Klammern oder einen
Lichtassistenten mit Wechselschuhen!
This was the first time that I took pictures in a place that proved very impractical. At first I tried to take pictures from
angles where I hardly had to go into the water or barefoot. Barefoot in a river with a camera in my hand I can not recommend because of the bad grip and the slippery surface.
So in the end, I was in the water with my shoes wet because of lack of preparation and I had to drive home with my feet wet .... this feeling when you step on a pedal and the water is slowly
squeezed out of the sole between your toes, indescribable.
But otherwise the river was great for taking pictures, the daytime gave it strong shadows on the body but these were lightened by the reflection of the water. Beautiful plays of light would have
been possible with the reflecting water as well.
I did not come up with the idea to lighten the shadows with a flash of lightning, but I had a reflector with me. The reflector proved to be quite useless only with a small tripod and a clamp at
the site. Another mistake in the preparation next time for something like a tripod that does not float away and more / better cling or a light assistant and with an extra pair of shoes!
# 9 Dunkler Hintergrund / Dark Background (by Kimball)
Bei meinen ersten Bildern vor dem dunklen Hintergrund hatte ich ja schon ein paar Probleme erläutert. Jetzt war aber das Cosplay dunkler somit musste ich die Belichtungsmessung in der Kamera
anpassen, von Matrix wo das ganze Bild in die Messung mit einfließt auf Spot wo die Belichtung anhand des ausgewählten Fokusbereichs eingestellt wird.
Inzwischen arbeite ich tatsächlich fast nur noch mit dieser Einstellung. Da ich fast nur Portraits mache und für mich eigentlich meistens der Augenbereich
ausschlaggebend ist passiert es mir eher, dass ich vergesse die Einstellung bei einem Gruppen oder Landschaftsbild um zu stellen.
Selbiges gilt für Fotos im Schnee, da hier der Hintergrund bedeutend heller ist als das tatsächliche Ziel kann es sein, dass dieses zu schlecht belichtet ist. Bei schwarzem Hintergrund mit
Matrixmessung werden die kleinen hell Bereiche dann zu hell. Natürlich sollte man dabei aber den Hintergrund auch nicht aus dem Auge Verlieren.
Als nächstes kommt D.Va und eine falsche Perücke.

In my first pictures against a dark background I already explained some problems. Now, however, the cosplay was darker so I had
to adjust the metering in the camera, from matrix where the whole picture is included in the measurement on spot where the exposure is adjusted based on the selected focus area.
In the meantime I almost only work with this attitude. Since I almost only make portraits and for me usually the eye area is crucial, it rather happens to me that I forget to adjust the shot in a
group or landscape.
The same applies to photos in the snow, since the background is significantly brighter than the actual destination, it may be that this is too poorly exposed. With a black background with matrix
measurement, the small bright areas become too bright. Of course you should not lose sight of the background.
The next will be D.Va and a wrong wig.
# 10 Fanart (by Kimball)
Dieses mal versuchten wir ein Fanart von D.Va der Seite Playwatch jetzt Overwatch nach zu stellen.
Was eine sehr interessante Aufgabe war, da für die korrekte Darstellung sowohl der Bildwinkel als auch die Brennweite vorgegeben waren. Die Brennweite ist wichtig, da z.B. durch eine kleine
Brennweite von 18mm alles was in Richtung Kamera geht wie ein Bein oder die Nase langgezogen wir und bei 200mm im übertriebenen Sinne plattgedrückt.
Aber je größer die Brennweite um so weiter weg muss ich für das Foto stehen, also große Brennweiten nichts für kleine Räume. 50mm ergeben eine recht natürliche Darstellung leider fehlte mir dazu
der Platz also nahm ich 35mm.
Der Blickwinkel war auch vorgegeben, ich musst gerade und etwas von unten fotografieren.
Normalerweise Fotografiere ich gerne von weit oben mit kleiner Brennweite so wirken Kopf und Augen groß und der Körper schmal, insgesamt entsteht ein süßes Bild.
Allerdings die Beine kurz weshalb es oft vorteilhaft ist wenn der Fotografierende sitzt wenn er die Cosplayerin stehend abbilden wird, so werden die Beine optisch langgezogen.
Wir haben einige Bilder gebraucht bis wir die Pose hatten auch gerade mit den Haaren, nur um nachher fest zu stellen, dass die Farbe der Perücke nicht stimmte und wir nochmal von vorn anfangen
durften.
Als nächstes folgt ein Shooting im Winter.


This time we tried to imitate a fanart of D.Va from Overwatch from the coverpage of Playwatch.
Which was a very interesting task, since both the image angle and the focal length were specified for the correct representation. The focal length is important because e.g. with a small focal
length of 18mm everything that goes towards the camera like a leg or the nose we stretched and flattened at 200mm in the exaggerated sense.
But the larger the focal length the farther away I have to stand for the photo, so big focal lengths are not for small spaces. 50mm result in a very natural appearance unfortunately I missed the
place so I took 35mm.
The view was also given, I have to photograph straight and something from below.
Normally, I like to photograph from far above with a small focal length so head and eyes look big and the body narrow, overall a sweet picture is created.
However, the legs short why it is often advantageous if the photographer is sitting when he will depict the cosplayer standing, so the legs are visually elongated.
We needed some pictures until we had the pose with our hair, only to find out later that the color of the wig was wrong and we were allowed to start all over again.
Next is a shoot in the winter.
# 11 Winter & Equipment (by Kimball)
Das erste Mal fotografieren bei Minusgraden und mit Lichtassistentin. Vorbereitung war hier wichtig zum Beispiel ein wetterfestes Objektiv eine Decke für die Cosplayerin/Model.
Des weiteren lässt bei Kälte die Akkuleistung schneller nach nicht nur bei der Kamera sondern auch beim Blitz.
Handschuhe für die Fotografierende Person wären zwar was tolles allerdings empfinde ich diese als einschränkend und verzichte somit lieber.
Ein Lichtassistent ist glaube ich mit das Beste was einem passieren kann. In meinem Fall eine Person mit Reflektor. Man sollte nur wissen wie und wo man die Person und den Reflektor positioniert
und dies auch entsprechend kommunizieren, das ist mir anfangs recht schwer gefallen.
Wetterseitig war perfekt für uns, nicht nur aufgrund der Eiskristalle überall sondern auch die leichte Bewölkung. Also nicht zu dunkel und kein starkes Licht was ungewollte Schatten
erzeugt.
Tatsächlich sind wir recht spontan aufgebrochen am 01.01.2017 aber die Kulisse war einmalig und das musste genutzt werden.
Taking pictures for the first time in freezing temperatures and with a light assistant. Preparation was important here for
example a weatherproof lens a blanket for the cosplayer / model.
Furthermore, in the cold, the battery performance is faster down not only the camera but also the flash.
Although gloves for the person taking photos would be great, but I feel this as restrictive and therefore prefer to do without.
I think a light assistant is the best thing that can happen to you. In my case a person with a reflector. One should only know how and where to position the person and the reflector and to
communicate this accordingly, that was very difficult for me in the beginning.
Weatherside was perfect for us, not only due to the ice crystals everywhere but also the light cloud cover. So not too dark and no strong light which creates unwanted shadows.
In fact, we broke up quite spontaneously on 01.01.2017 but the scenery was unique and that had to be used.
# 12 Ein Raum / One Room (by Kimball)
Fotografieren mit kleinem Equipment und vorhandenem Licht.
Es war wirklich nett, dass wir den Raum mit seinen Antiken Möbeln nutzen durften. Die alte Bibel aus dem Jahre 1902 und ein paar Edelsteine stammen von mir und passten super zum Cosplay.
Die gelbliche Refletion des Lichts durch das braune Holz und die warme Lichtquelle ergeben eine sehr gemütliche Atmosphäre.
Alles in allem ein einfaches Shooting nachdem sich ja auch etwas Routine eingestellt hatte.
Nötig war lediglich ein Lichtstarkes Objektiv wegen der schlechten Lichtverhältnisse.
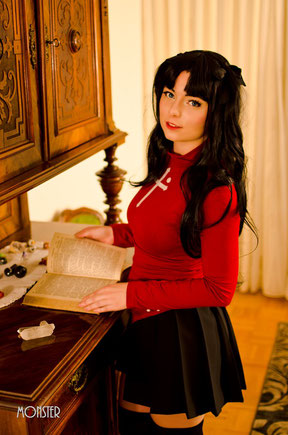
Photographing with small equipment and available light.
It was really nice that we were allowed to use the room with its antique furniture. The old Bible from 1902 and a few gems come from me and went great with the cosplay.
The yellowish reflection of light by the brown wood and the warm light source create a very cosy atmosphere.
All in all, a simple shoot after a bit of routine had set up.
Only a fast lens was necessary because of the poor lighting conditions.
# 13 Übung / Practice (by Kimball)
Langsam spielte sich bei den Shootings eine gewisse Routine ein leider habe ich einige Fehler weiter mit mir durchgezogen,
wie mit der zu weit offener Blende (F1,4) zu fotografieren und somit auch in Kauf zu nehmen das Cosplay weniger Aufmerksamkeit zu würdigen als es eigentlich verdient.
Durch die Unschärfe im Bild kann man die Aufmerksamkeit auf die Augen lenken die scharf abgebildet werden.
Nicht, dass dieser Effekt zwingend negativ ist, im Gegenteil ich empfinde diesen immer noch sehr schön.
Aber ich habe ihn zu viel genutzt.
Blende F2,5 bis F4 währen wohl bei genug Licht besser gewesen.
Jedoch hat es mir oft an genug Licht gefehlt, dazu eben dann die Angst vor dem ISO-rauschen so wurde ich recht unflexibel.
Hier noch ein Link für die, die mehr über die Blende erfahren möchten.
https://www.foto-kurs.com/kamera-blende.php
Slowly played a certain routine in the shootings, unfortunately I carried some mistakes further with me,
Like to photograph with the too wide open aperture (F1.4) i accept the cosplay to appreciate less attention than it actually deserves.
Due to the blurring in the picture, one can draw attention to the eyes, which are sharply depicted.
Not that this effect has to be negative, i still think it is pretty .
But I used it too much.
Aperature F2.5 to F4 may have been better when there is enough light.
However, I often lacked enough light, so then there was the fear of ISO noise, so I became quite inflexible.
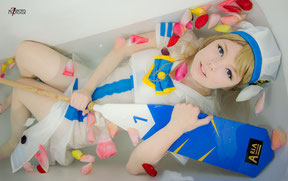
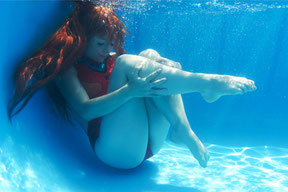
# 14 Unterwasser / Underwater (by Kimball)
Mein erstes Unterwasser-shooting.
Verwendet habe ich eine wasserdichte DSLR-Hülle für meine Nikon D5600.
Gut war, dass die Hülle so groß war, dass der Verwendung meines lieblings Objetiv dem Sigma 18-35 F1,8 nichts im Wege stand.
Mein erster Gedanke, die Appfunktion der Kamera zu benutzen und so die Bilder vom Handy aus zu machen war eher minderer Qualität.
Die Bewegungen des Models waren zu schnell und ein Fokusieren nicht möglich.
Also begab ich mich auch ins Wasser und nahm die schlechte Bedienbarkeit duch die Hülle hin.
Ein durch den Sucher schauen oder die Nutzung des Displays war nicht möglich da ich keine Taucherbrille hatte und das Wasser den Sensor unter dem sucher auslößte welcher das Display
ausschaltet.
Also fotografierte ich nach Gefühl in die Richtung.
Da ich inzwischen die Kamera dauerhaft mit AF-C und Backbuttonfokusing nutze habe ich nichts Verstellen müssn. Durch diese Funktion halte ich nur den AE-L/AF-L-Knopf gedrückt wodurch dauerhaft
Scharfgestellt wird, auch eine unterbrechung des AF-C die normalerweise duchrch das Auslösen erfolgt findet nicht statt.
Ich habe die Blende runter geschraubt auf F5,6 da ich wieder erwarten Unterwasser genug Licht hatte und die darduch entstehende Tiefenschärfe als Fehlerpuffer haben wollte da der Autofokus die
kleinen Blasen leider gerne dem Gesicht vorzog.
Nun war mein großer Fehler noch, dass ich meist im Hochformat wie von Portraits gewohnt fotografiert habe, leider war der Pool auch recht klein was die Möglichkeiten schmälert.
Aber es wahren doch ein Paar Bilder dabei.
I used a waterproof DSLR case for my Nikon D5600.
It was good that the case was so big that the use of my favorite objectiv did not stand in the way of the Sigma 18-35 F1.8.
My first thought to use the App-function of my camera to make the pictures via phone was rather poor quality.
The movements of the model were too fast and focusing was not possible.
So I went into the water and took the bad usability through the cover.
A look through the viewfinder or the use of the display was not possible because I had no diving goggles and also the water activated the sensor which turns off the display.
So I took photos after feeling in the direction.
Since I now use the camera permanently with AF-C and backbuttonfocusing I have nothing to adjust. By this function, I hold only the AE-L / AF-L button pressed which is permanently focused, even an interruption of the AF-C normally duchrch the triggering does not take place.
I have screwed down the aperture on F5.6 because I expect underwater had enough light and the darduch resulting depth of field as a buffer because the error autofocus the little bubbles unfortunately preferred the face.
Now my big mistake was that I used to shoot mostly in portrait format as I was used to portraits, unfortunately the pool was also quite small which reduces the possibilities.
But there are a few pictures here.